Finders Tweakers

It never fails. Every time I set off on a thrifting trip, I start the day with a skip in my step because I just know I'm going to find everything I'm looking for, and it will all cost, like, a dollar, and I will have so much fun sprucing my findings, and then everyone will lavish me with oohs and aahs because I am the most amazing thrift sore decorator that ever did live.

I don't know where I get these notions. I never find what I'm looking for, things almost always cost more than I think they should, and I am only a so-so thrift store decorator.

Nevertheless, on Saturday morning I set out, giant cafe latte in hand and that little skip in my step, to find whatever there was to find and a few specifics:

1- Two frames to begin my "hooked" project
2- Something large and sculptural for the top of my bookshelf
3- Louis chair for my god-awful bedroom (if I was lucky)

So it is not surprising that after six stores I dragged my tired self home with absofreakinlutely nothing. I know. It's sad. 

But it's OK! I persevered and sneaked in a trip to TJ Maxx on Sunday. I didn't find anything on my list, of course, but I did find some other goodies:

BUDDHA BOOKEND - $7
The plan: Maybe I'll saw him off of the base and gold leaf or paint him a bold blue. Or maybe I will find peace with Mr. Buddha Bookend and just leave him be.


What he could be:


LACQUER BOX - $9
The plan: As soon a I saw this I imagined a copy cat west elm jewelry box

 
What it could be (in a hundred years when I finally find some sort of metal greek key applique)...


NESTING TRAYS - $5 and $4!
The plan: I know... these are the most hideous things ever. I hate map motifs, but I LOVE lacquer trays, and these have a fabulous shape. I think whatever I do will involve some gold, black, and white paint because these babies are gonna live on my entry table.


What they could be (so many possibilities!)...


kolektorbali.tumblr.com
westelm.com
bp1.blogger.com

westelm.com
store03.prostores.com

Return of Venus

My jaw dropped when I saw the first page of the new Lonny issue. If you've been following Swoon, you'll know why... 

My waning inspiration to complete my copy-cat Venus in Yellow has been unearthed! I haven't figured out who this artist is yet, but I wonder if he/she was inspired by Hanseggar's Venus as well. The mood of these pieces is a little dark for me, but I do love them. I hope this knocks me off my lazy horse this weekend so I can get crackin on this project. We'll see.

Make it purrrr

To Do:

1) Find a chair. Any ol' chair.
2) Find a furry throw. Any ol' furry throw.
3) Throw that throw over that chair.
4) Pretend like it was all my idea.

Of course, it wasn't...


How to love (and lose) a louis chair

One of my many obsessions at the moment is with Louis chairs. What started this fixation? The moment I found a listing on craigslist for a PERFECT specimen to paint and reupholster for only $25!! Well, the interest started there, but the obsession didn’t hit until I lost it to someone else.

Yes, I called about it first thing in the morning, but instead of jumping out of my chair and into my truck at that very moment, I decided to wait until I got off work that afternoon.  I was so excited about it all day, imagining the color I would paint it… the fabric I would cover it in… how I would magically turn into a princess every time I sat in it. But my swoonings were soon squashed when I called the seller to tell her I was on my way and she said with a forced sweetness, “oh honey, someone just picked it up!”

So I went home, head hanging low, with an emptiness inside that only a fellow buy-something-for-nothing-and-turn-it-into-something-amazing-nut could understand.

Since then I have somehow made it through each day, but I have not forgotten. No, I am now in  full-blown cheap Louis chair search mode.  Come hell or high water I will find her, but until then, let’s dream together…


...Sigh...


Awe... this one looks just like my craigslist loss:


and so do these...


Ok, I'm gonna go eat some ice cream now. Sitting on my floor. Ugh.


A glittery, girly tablescape for, like, no money

I had a gorgeous group of mommies over for Mother's Day dinner on Sunday, and I wanted to pretty things up a bit. This tablescape is obnoxiously girly, and I love it! I had no money to spare, so I had to get creative. This whole thing set us back about 12 bucks.

First I started with the runner. I found this fabric at Hobby Lobby for $4 a yard. And since I'd sooner die than sew something, I used some left over iron-on hemming tape from a pack of ikea curtains. It took me about 15 minutes to do this, but it woulda taken me a lot longer if I was working with fabric that doesn't have a repeating pattern to cut by. If I had to measure and pin the folds, I would have given up from the start. I'm impatient like that.


Next, I needed a centerpiece. Luckily, my super hot mom is also a super awesome florist. I picked up a few pretties she had left over from Mom's Day deliveries and came up with this using a tray and some bud vases from around the house:


And these placemats are nothing more than some glittery cardstock I had in my craft closet. There are a few drops of wine on them now, but it won't stop me from making something else out of them later!

And one lesson you learn from having a gay uncle is that a place setting is never complete without a gift. So Rosa Leigh and I got to making some cute necklaces for these Mommies. Who knew some cheap hemp and alphabet beads could be so chic?


The most fun part was making these pillow boxes out of that yummy cardstock. I'll post a tutorial on that soon. That cute ribbon is from Hobby Lobby too!


Now that I see it all in one post, I'm thinking it looks like this took me forever. Seriously, I did all this in a total of maybe 2 hours, and this is happy work I tell ya!

Hooked!

Oh. My. God. I feel empty inside because these are not hanging in my entryway right now! You can bet I'm not gonna spend $65 each on em though. But just you wait. Let me get my tool belt...

the Framed Objects

By the way, I don't really have a tool belt. It's a tool box. Well, it's more of a tool tupperware container. I gotta work on that.

created at: 05/04/2011

Source: Thinkofthe.com

Pining for Pinterest: Send a girl an invitation!

I've been waiting and waiting and waiting for an invitation to pinterest, and nothing! Do you have an invitation???? You'd be amazed what I'm willing to do for one. Ok, not really. But seriously, please email it to swoonobsessed@gmail.com. Then your good deed will be deeded for the day! Grazie!

DIY: How to make a fabulous memo board

Remember this post about Rosa Leigh's room in progress? Well, I accomplished two out of four items on my to-do list. I know. Wow. So here is the picture of her memo board before I finished it:


And here it is now!


As you can see, I finally finished the ribbon and painted a frame around it on the wall. Cute huh? Here is how I made this thing outta scrap wood, faux leather, and some fabulous fixins (cost me about $20):

Materials:
-Margarita on the rocks (first thing's first)
-Piece of plywood or mdf cut to size
-Enough yardage of fabric to cover the front and overlap by at least a few inches on each side. (I used faux white leather from Joannes)
-Batting (I used pretty thin batting from Joannes. I didn't want it to be too tufted looking. Up to you)
-Upholstery tacks (got those from Joannes too, but available at any home improvement or craft store)
-Staple gun and lots of staples
-Hammer and needle-nose pliers
-Ribbon (you can do some fancy math to figure out how much you need or just wing it like I did)
-Picture hanging hardware

1) Lay the batting on the floor and center the wood on top of it.
2) Cut the batting evenly on each side to make it at least 3 inches larger than the wood.
3) Wrap the edges of the batting around the edges of the wood and staple. Don't pull too tight, and you don't need a ton of staples yet.
4) Repeat step one through four with the fabric. Use more staples on this layer, and don't forget to not pull too tight. If you do, you'll make it wrinkle on the front.
5) If you are a patient perfectionist, measure and mark even intervals around the frame so you know where to place your ribbon. I am impatient and lazy, so I eyeballed it.
6) Start wrapping your ribbons and securing with one staple at each end on the back. Finish all parallel pieces in one direction first, then do the other direction.
7) Hammer the upholstery tacks in at each intersection. This was so frustrating at first until it dawned on me to use the pliers to help hold the tack in place while I hammered.Then it was super easy and kinda fun - my favorite step!
8) Finish the back by trimming the ribbons and installing your picture hanging hardware.
9) Hang it, girl! (or boy!)


venus in yellow

Oil Painting by John Konstantin Hansegger

I cannot stop thinking about this painting by John Hansegger. I want to make my own. In fact, I've already started planning the piece. I'm going to do a HUGE portrait of one of my favorite sculptures, Pauline Bonaparte. You can read all about her here.

http://www.jacqueslanciault.com/wp-content/QDSC999iPauline_800.jpg

My problem (yes, I always have a problem) is that it's very hard to contain myself when figure drawing. I tend to go crazy with detail. Here is the first study I did last night. See what I mean? I'm pretty darn proud of those pillows though.


So I knew I had to chill out. Here is my second study. I'm getting the hang of it.


My other problem is I don't really know how to achieve the look of Hanseggar's painting. It says it's in oil, but I'm not sure how he penciled over the paint. I'll have to play a little this weekend. If you have any ideas, please post a comment! Looks like it will be a while before I'm done, but hopefully it'll be worth it. Imagine her in an ornate gilded frame! So sexy!

Sources:
Valerie Goodman Gallery

Borghese Gallery

Connelly Anomaly


Photobucket

I have a few Jennifer's on the brain tonight. But this is one I'm thinking of as I listen to David Bowie. If I was a man, this is who I'd be dreamin about. I think I'm gonna go pencil in my eyebrows now. 

Tomatoes and Cucumbers


My husband is a veggie head. That's not to say that he loves to eat vegetables. Really, he just loves to grow them. And I gotta say, he's good at it. The above photo is only a small picking from last year's harvest.  Problem is, though they produce a lot of goodies, his gardens themselves aren't pretty to look at, and we have many love spats about this each year. Crooked, makeshift fences, erratic "latices" of string, overgrown borders of weeds... seriously.  Of course, the ONLY place he says the sun is "just right" for his ugly garden is in the middle of my back yard - the direct focal point of my outdoor and indoor living space (from all living and dining room windows).

Now, I love that Josh is the kinda man that doesn't understand what makes something pretty. But c'mon! See what I mean? This is last year: (don't miss the beer bottle in the pot)


Alas! Josh has finally succumbed to my demands for a prettier garden. I told him I will not eat a single tomato until he builds me a pretty garden to look at. And the boy loves to feed me. So look what he did. I'm so proud!


And look at these cool tomato cages he built out of the left over wire fencing. Grow, babies, grow!


We joke that now that the garden is pretty, nothing will grow. I'm hoping this isn't true. I'll keep you abreast on the progress. And those of you who know me will hopefully be nourished from the bounty soon!


A definite maybe


Just ran across this photo on Design Sponge. You know what I'm thinking don't you? These gorgeous wall panels may be exactly what my ugly bedroom needs! What do you think? Should I fill the huge frames with a darker shade of aqua, a crisp white, or maybe a fabulous damask wallpaper... say, something like THIS:

http://designerwallcoverings.com/WallpaperStore/images/DIG40000-VictoriaDamaskBlueBrown2.gif

We'll see. First step is convincing Joshua to do it. I'll keep ya posted (pardon the pun).

Lamp Love

My friend, Karen, and I felt so sorry for this vase on the clearance rack at Stein Mart... so bad that we rescued it and turned it into a fabulous lamp!

Before:


After!


The vase was only $13, and the whole lamp ended up costing around $35! This was a fun project, and this is how you can do it...

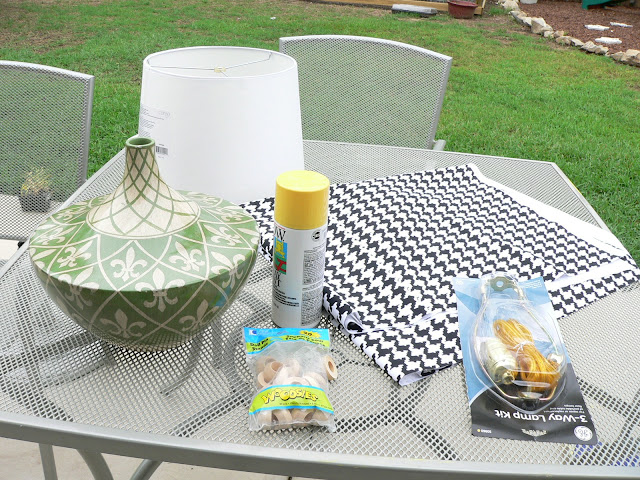
1) Gather materials (see photo below): vase, spray paint, lamp kit (bought at goodwill for $6!), fabric, ribbon, wood thingies with holes to cap off mouth of vase (got these at Joannes), drill with diamond bit (Lowes).

2) Unless your vase is wood (which would be weird) use a diamond bit to drill a hole in lower side of vase. We got ours from Lowes for $15. Diamond bits work on tile, glass, ceramic, and probably surgical steal.

3) Spray paint vase. I regretted not using a primer spray first because it took nearly 500 coats to cover the design. #1 spray painting rule: do many super-light coats to keep from dripping. It's tedious but worth it. Grab a margarita and make an evening out of it.

4) Cover lamp shade with fabric and grosgrain ribbon to trim. We bought a self-stick shade from Joannes. They are cheap (this one was $8) and super easy to stick fabric or paper to. You could also use spray adhesive on a regular shade.

5) Assemble lamp kit parts. You can easily find lamp kits and parts at home improvement stores. We stopped by Goodwill to look for cheap lamps to disembody and use parts from (they have like $3 lamps that are great for this), but they just happened to have an unopened lamp kit for $6. That's just crazy luck. We added the wooden piece (available at craft stores - anything with a hole will work) to the assembly to act as a cap on the mouth of the vase (see picture of assembly below).

6) Glue the wooden piece to the mouth of the vase and install shade. I used Liquid Nails from Lowes.

7) Turn that baby on and do a super cool victory dance.


This is Joshua's 'oh man I hope I don't break this thing' look: 


The very sad ending to this story is that I built this for Karen's master bedroom that I am helping her revive. I am heartbroken to deliver it to her tomorrow because it looks so happy in my nook. But I know it is best, for it will be even happier in her newly fabulous boudoir. I'll be posting about that project soon. At least I'll always have the memories...