Before:
After!
The vase was only $13, and the whole lamp ended up costing around $35! This was a fun project, and this is how you can do it...
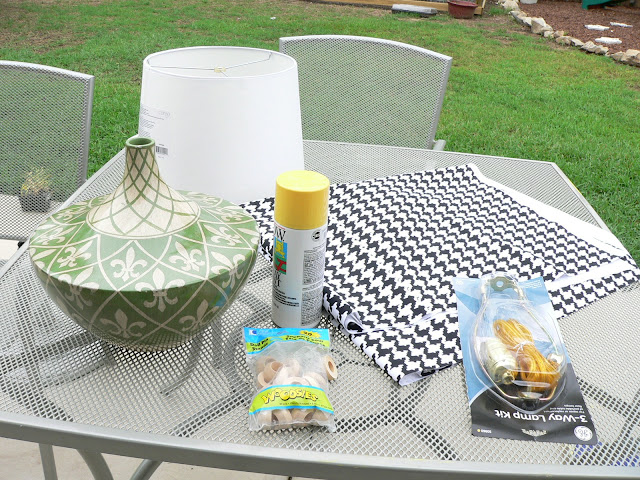
1) Gather materials (see photo below): vase, spray paint, lamp kit (bought at goodwill for $6!), fabric, ribbon, wood thingies with holes to cap off mouth of vase (got these at Joannes), drill with diamond bit (Lowes).
2) Unless your vase is wood (which would be weird) use a diamond bit to drill a hole in lower side of vase. We got ours from Lowes for $15. Diamond bits work on tile, glass, ceramic, and probably surgical steal.
3) Spray paint vase. I regretted not using a primer spray first because it took nearly 500 coats to cover the design. #1 spray painting rule: do many super-light coats to keep from dripping. It's tedious but worth it. Grab a margarita and make an evening out of it.
4) Cover lamp shade with fabric and grosgrain ribbon to trim. We bought a self-stick shade from Joannes. They are cheap (this one was $8) and super easy to stick fabric or paper to. You could also use spray adhesive on a regular shade.
5) Assemble lamp kit parts. You can easily find lamp kits and parts at home improvement stores. We stopped by Goodwill to look for cheap lamps to disembody and use parts from (they have like $3 lamps that are great for this), but they just happened to have an unopened lamp kit for $6. That's just crazy luck. We added the wooden piece (available at craft stores - anything with a hole will work) to the assembly to act as a cap on the mouth of the vase (see picture of assembly below).
6) Glue the wooden piece to the mouth of the vase and install shade. I used Liquid Nails from Lowes.
7) Turn that baby on and do a super cool victory dance.
This is Joshua's 'oh man I hope I don't break this thing' look:

The very sad ending to this story is that I built this for Karen's master bedroom that I am helping her revive. I am heartbroken to deliver it to her tomorrow because it looks so happy in my nook. But I know it is best, for it will be even happier in her newly fabulous boudoir. I'll be posting about that project soon. At least I'll always have the memories...


Go girl! I love your creativity and imagination. Wonder where all that talent comes from....not really you've got it in your blood. Keep on it's wonderful! I wish had your talent.....Nancye
ReplyDeleteLOVE, LOVE, LOVE MY LAMP!! It looks fabulous in my room! You are awesome and a dear friend. One thing you failed to mention -- how you almost dropped the vase after Josh drilled the hole! Glad you have quick reflexes - you know this cheap ole girl would have freaked! Because I don't know which profile to select I am chosing anonymous - but obviously this is Karen!
ReplyDeleteSuch a cute lamp! I'm in the process of making a lamp from a vase myself, actually...
ReplyDeleteMy question, however, is where did you get that cute white vase/pen holder from? I've seen it around a bit, but can't find it anywhere. Thanks!
Found this on Better After... I love it! Thank you so much for the tutorial. I'm bookmarking it now! I always get so frustrated with the price of lamps that I like. This may be a potential alternative!
ReplyDeleteReally cute, love the houndstooth. I have been wondering where or on what I could give it a go as a pattern, so maybe a lamp!
ReplyDeleteFantastic. I love it. I am using a hoosier as a secretary also in a bedroom. It works great doesn't it. Hugs, Marty
ReplyDeleteVisiting from Better After.. the lamp looks terrific. Now it gives you something to look for again with your friend Karen!
ReplyDeleteThanks everyone! Ellen - That is a planter from Ikea. Super cute and super cheap. Just go to Ikea.com and search KARDEMUMMA. They have a few other sizes and patterns as well. Happy shopping!
ReplyDeleteThanks, Erica! I knew I had seen it somewhere! Just couldn't remember which store.
ReplyDeleteBTW, I found your blog via Better After.
This is a great DIY project!
ReplyDelete